How to Create a Popup in HTML (CSS & JavaScript Guide)

Summarize
Need to add a popup to your website? You have two options: build it yourself with HTML, CSS, and JavaScript or use a no-code builder. The first gives you direct control over the code. The second makes it easier to update campaigns without returning to development each time.
We’ll start with how to create a popup in HTML and explain where CSS and JavaScript come in. If you prefer to keep campaign changes out of the website code, the second method walks through building and publishing a popup with Claspo. You’ll also learn how to shape the offer, choose the right moment to show it, and avoid chasing visitors who have already converted. If your project uses the framework, follow our Bootstrap popup guide for the implementation details.
How to create a popup in HTML: the manual method
Start with the job your HTML popup needs to do. A discount signup needs an email field, while a sale announcement may need only a short message and a button. This choice will determine what goes into the HTML and what JavaScript needs to control.
Step 1: Prepare the content and assets
With the goal in mind, prepare the content: a heading, supporting text, a form, a CTA, a close button, and, if needed, an image. If you use one, it must be accessible through your website, a CDN, or another hosting service. Add descriptive alternative text when the image carries meaning or an empty alt attribute when it is purely decorative.
Step 2: Build the popup structure in HTML
If you are building the page from scratch, you will also need the standard HTML document structure: a DOCTYPE declaration, a head section, and a body section. On an existing website, these elements are already in place.
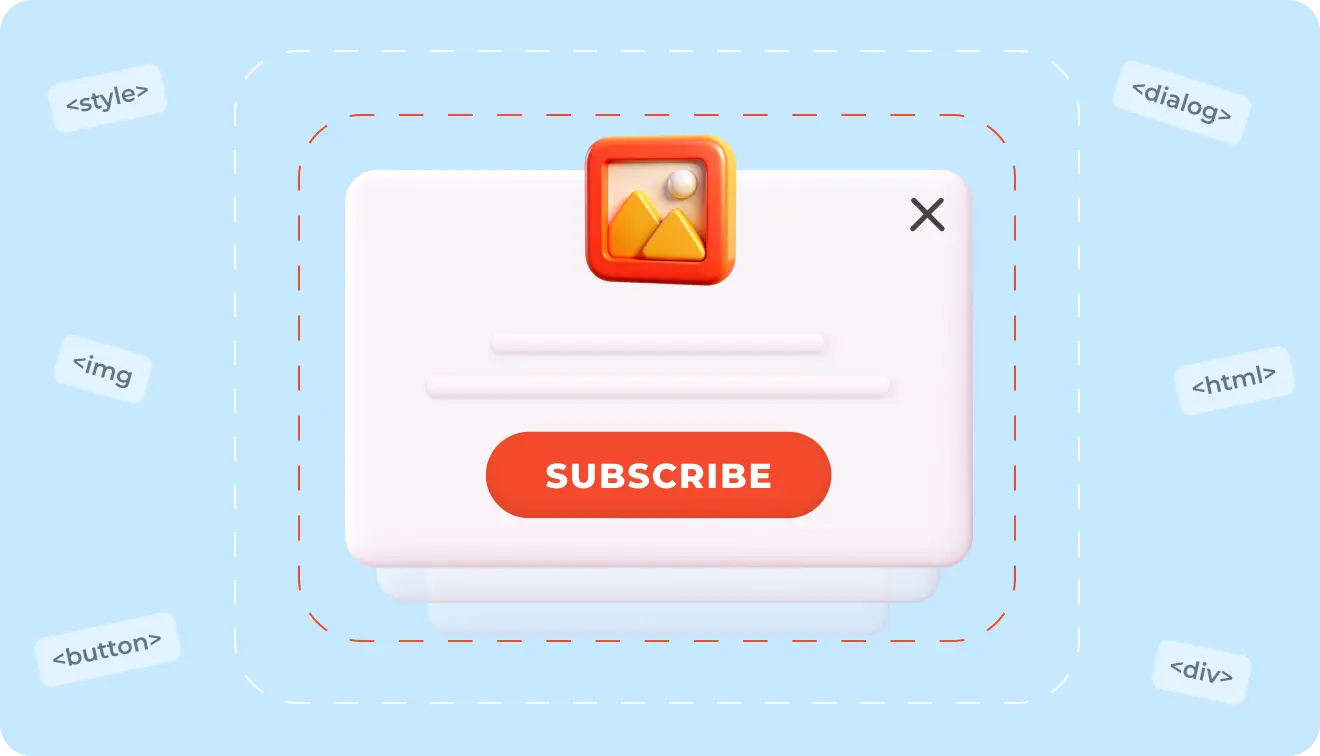
The popup usually includes:
Trigger button: opens the popup.
Popup container: holds the complete message or form.
Heading and message: explain the offer or requested action.
Form: collects visitor information when needed.
CTA button: submits the form or moves the visitor to the next step.
Close button: lets the visitor dismiss the popup.
Image: adds an optional visual.
For a modal HTML popup box, the native HTML dialog element is generally a better starting point than a generic div. It provides appropriate semantics and some built-in modal behavior. A div-based popup requires extra work to manage accessibility and keyboard focus.
The popup should also be programmatically connected to its heading and description so that assistive technologies can identify it correctly.
Step 3: Add CSS popup styling
CSS controls the popup’s position, dimensions, colors, typography, spacing, and visible and hidden states. The stylesheet usually covers:
Global styles: keep element sizing and typography consistent.
Backdrop or overlay: dims the page behind the popup.
Popup container: sets its position, width, maximum height, padding, background, border radius, and shadow.
Buttons and form fields: define default, hover, and keyboard-focus states.
Animations: control how the popup appears and disappears.
Responsive rules: adapt the layout to different screens.
Motion preferences: reduce or remove animations when requested by the visitor’s device settings.
A custom font can be loaded through the page head or imported into the stylesheet, but it is not required for a clear and effective CSS popup.
Step 4: Add JavaScript functionality
JavaScript controls the popup’s behavior. A basic setup performs four tasks:
Finds the elements: identifies the popup and its open and close buttons after the HTML is available.
Opens the popup: displays it when the visitor uses the trigger.
Closes the popup: hides it after a click on the close button, the Escape key, or, if enabled, the backdrop.
Manages focus: moves keyboard focus into the popup and returns it after closing.
A basic open-and-close function does not provide targeting. Showing the popup after a delay, at a certain scroll depth, on selected pages, or only once per visitor requires additional logic. Frequency limits also need to be stored, for example, in a cookie or local storage.
If you create an HTML popup form, browser validation and JavaScript do not process the subscription by themselves. The form must send the data to a secure server endpoint or connected marketing platform.
Tips for a better HTML popup
Use a backdrop.
A semi-transparent backdrop separates the popup from the page. Apply transparency to the backdrop’s background color, not to the container holding the popup. Otherwise, the popup content may become transparent too.
A modal dialog creates a backdrop that you can style directly. A div-based popup needs a separate overlay or an equivalent CSS solution.
Set clear size limits.
Use a maximum width, enough padding, and a contrasting background. For a centered modal, position it relative to the viewport rather than the surrounding page content.
Set a maximum height and allow internal scrolling so that longer content remains accessible on smaller screens.
Keep the message focused.
An HTML popup message should have one clear purpose, a short explanation, and one main CTA. Too many fields or competing actions make it harder to understand.
Design for mobile screens.
Percentage-based widths and media queries are not enough on their own. Leave space around the viewport, limit the popup height, allow scrolling, and make buttons and fields easy to tap.
Make it accessible.
Visitors should be able to open, use, and close the popup with a keyboard. Focus should move inside when it opens and return to the previous element after closing.
The popup should also support the Escape key, provide a clear accessible name for the close button, and prevent interaction with the page behind it while open.
No-code method: build the popup visually
If you searched for how to create a popup in HTML because you need one on your site — not because you want to code it — a no-code builder may be a better fit.
Pick a template in Claspo, or open a blank layout if you already have something specific in mind. Click any element to change it, add the fields you need, and rearrange the layout for mobile. Once the popup looks right, decide which visitors should see it and when. You never have to open or edit the underlying popup HTML code.
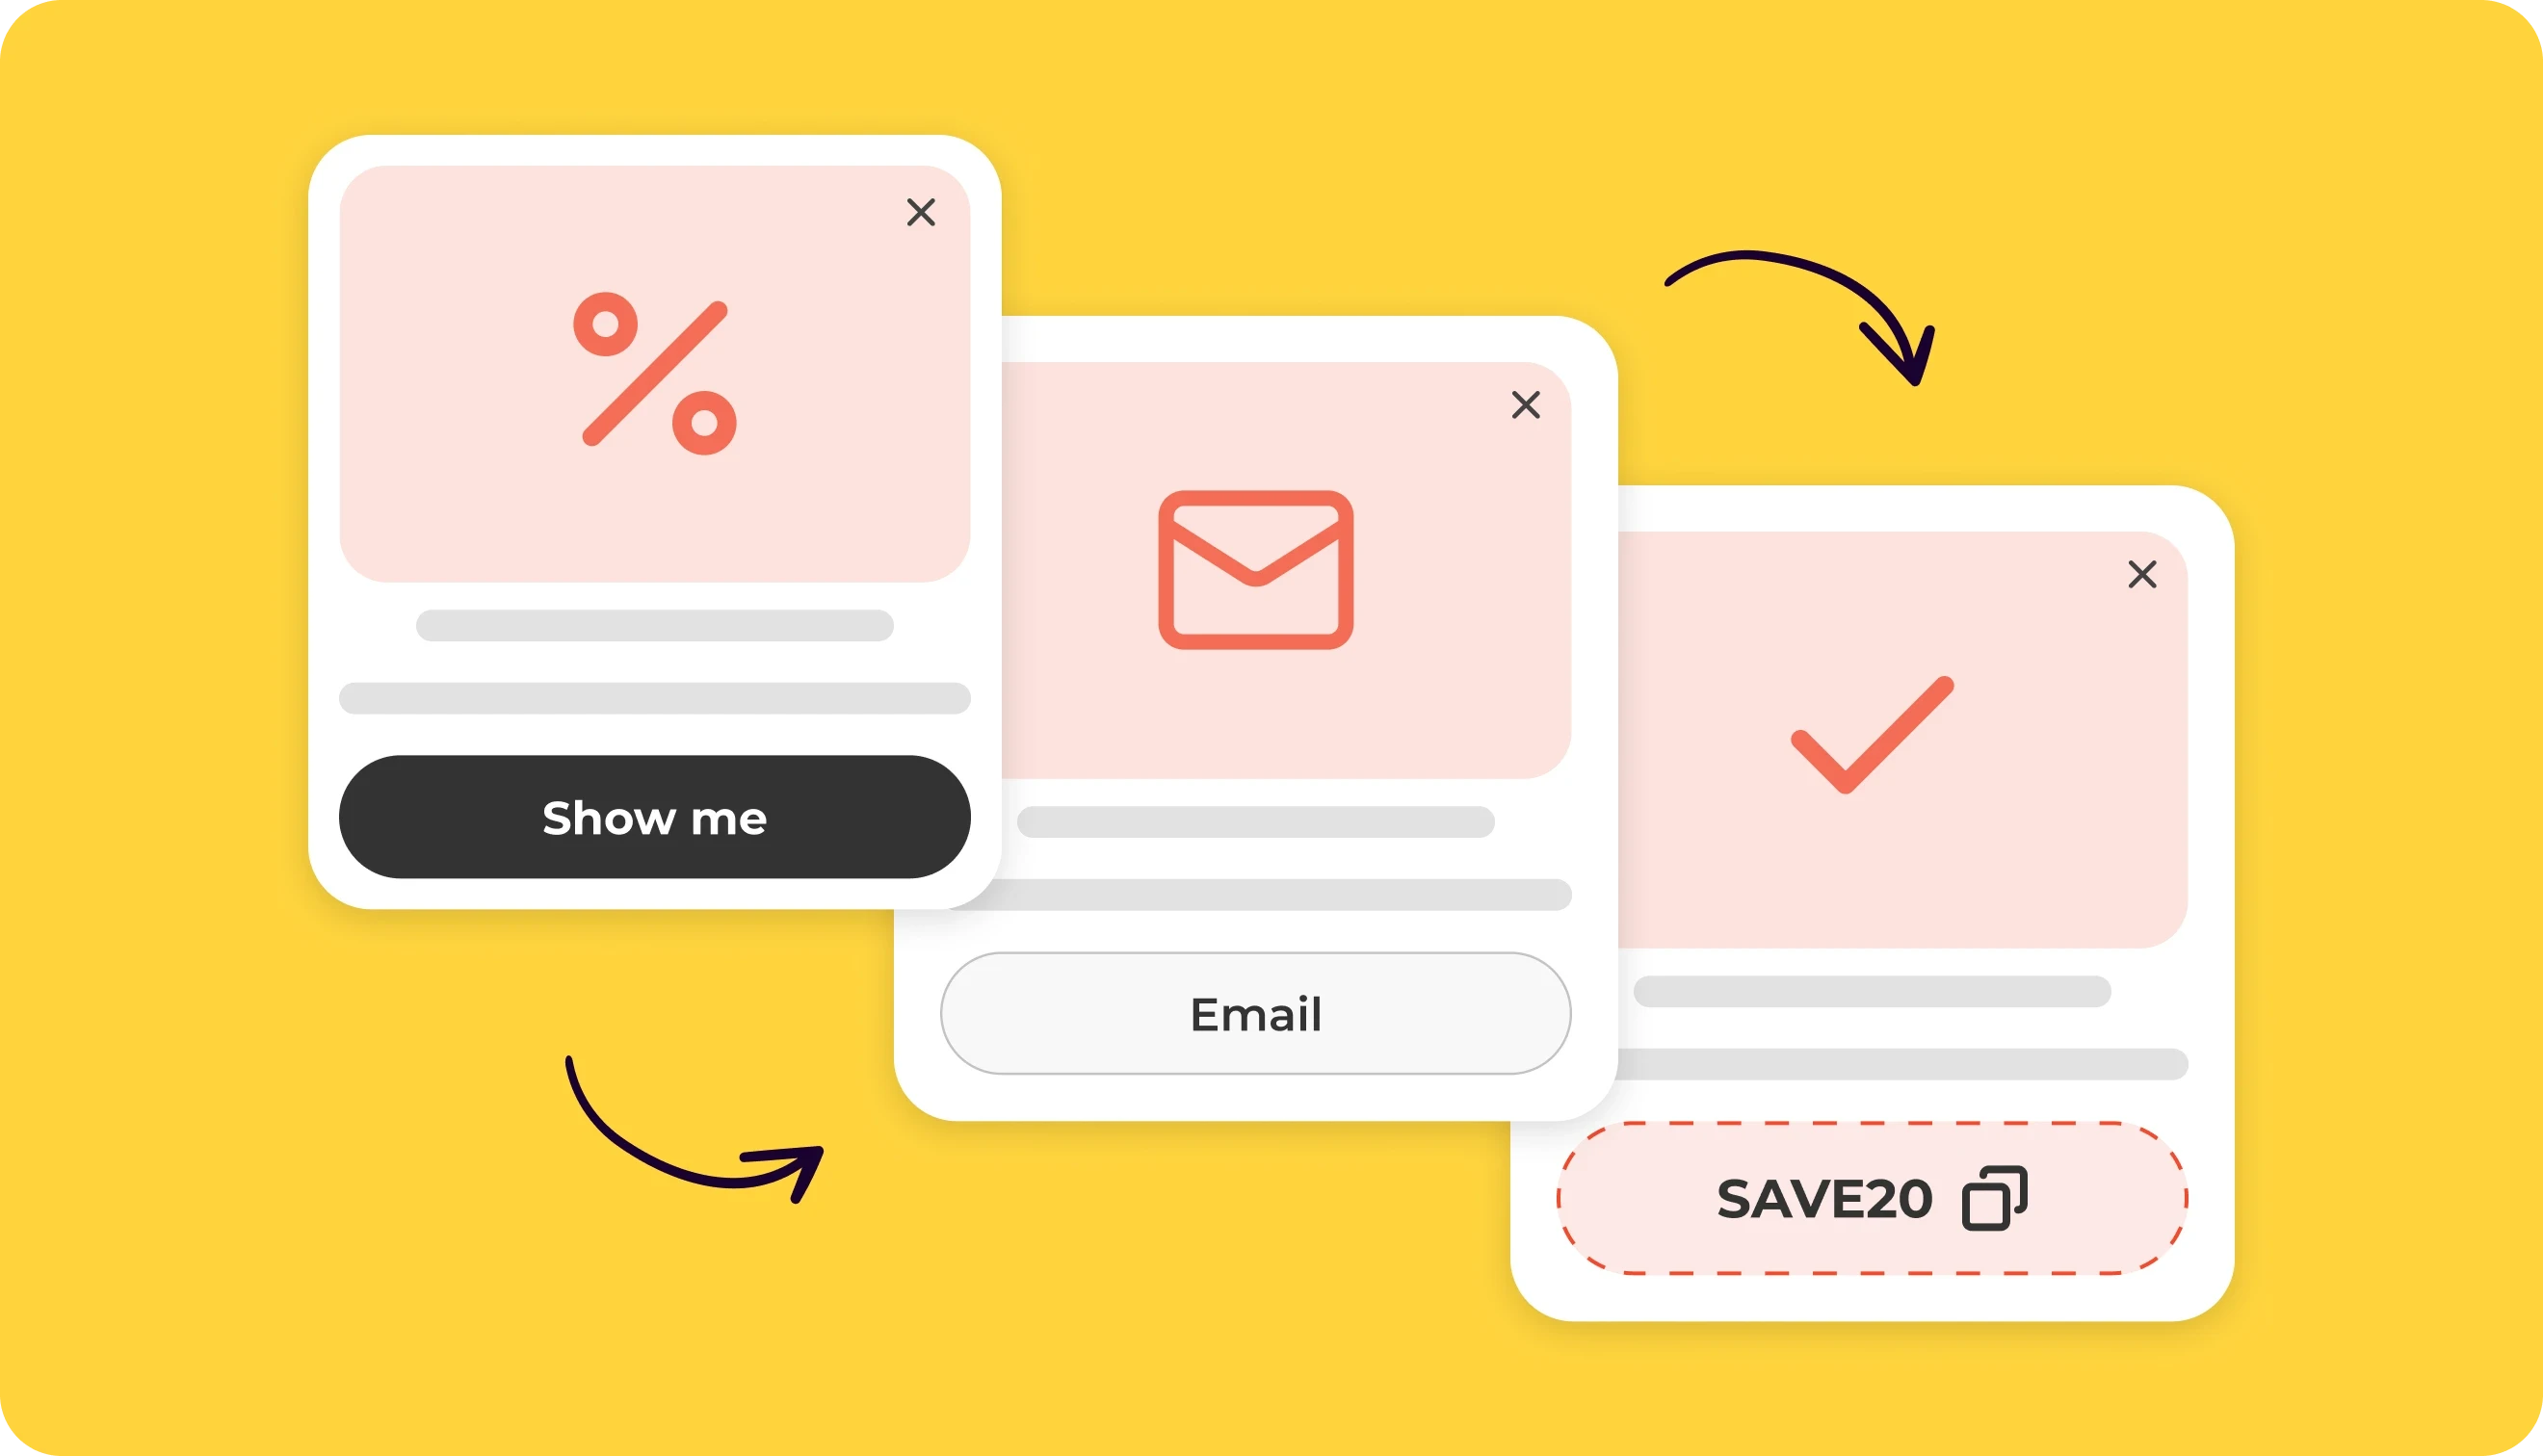
The difference becomes even more noticeable with complex mechanics. For example, Claspo has templates for gamified popups, multi-step forms, and quizzes with conditional logic, or lead generation popups with Choice buttons for instant segmentation. Building the same thing by hand would involve much more than HTML: you would need to work out the design in CSS, write the interactions in JavaScript, account for every possible path, and test the whole flow.
Once Claspo is connected to your website, you can publish new popups and update existing ones from your account instead of adding code for every campaign. Here’s how it works.
How to make a popup with Claspo
With Claspo, you can begin with a ready-made design and adapt it to your campaign. Here is how to create a popup from a template.
Step 1. Choose a template
Create a free account and open the widget library.
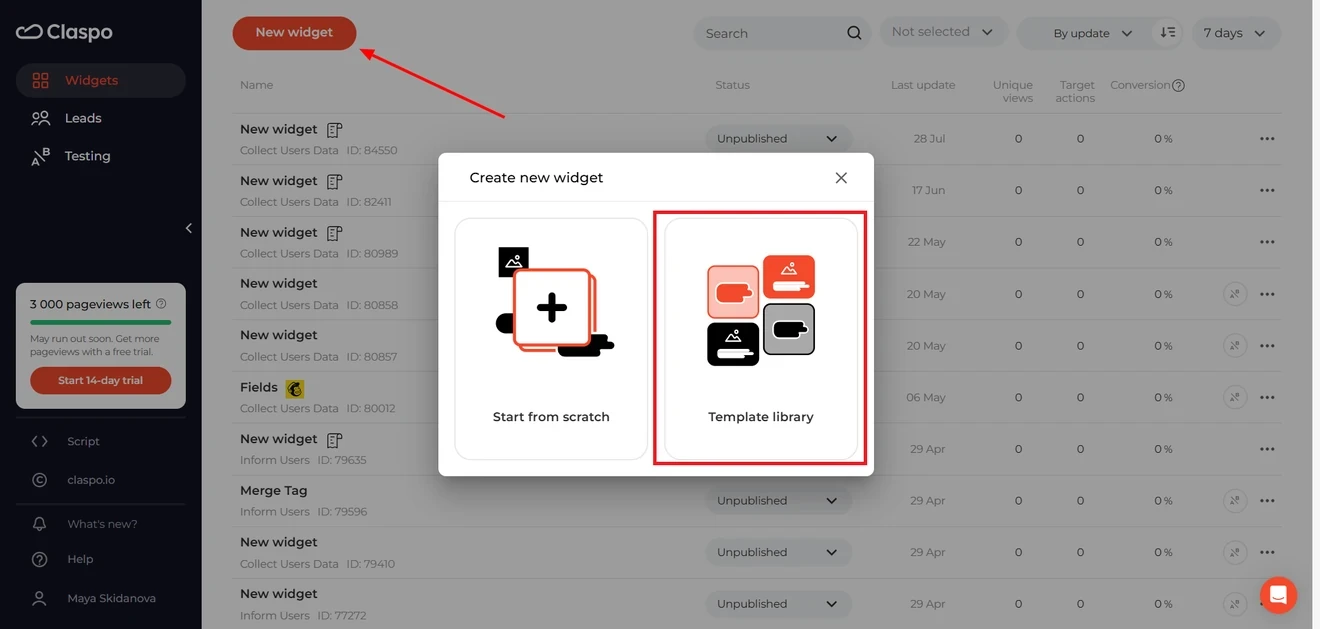
Browse the available popup templates or use the filters to narrow the selection by use case, feature, layout, industry, and season.
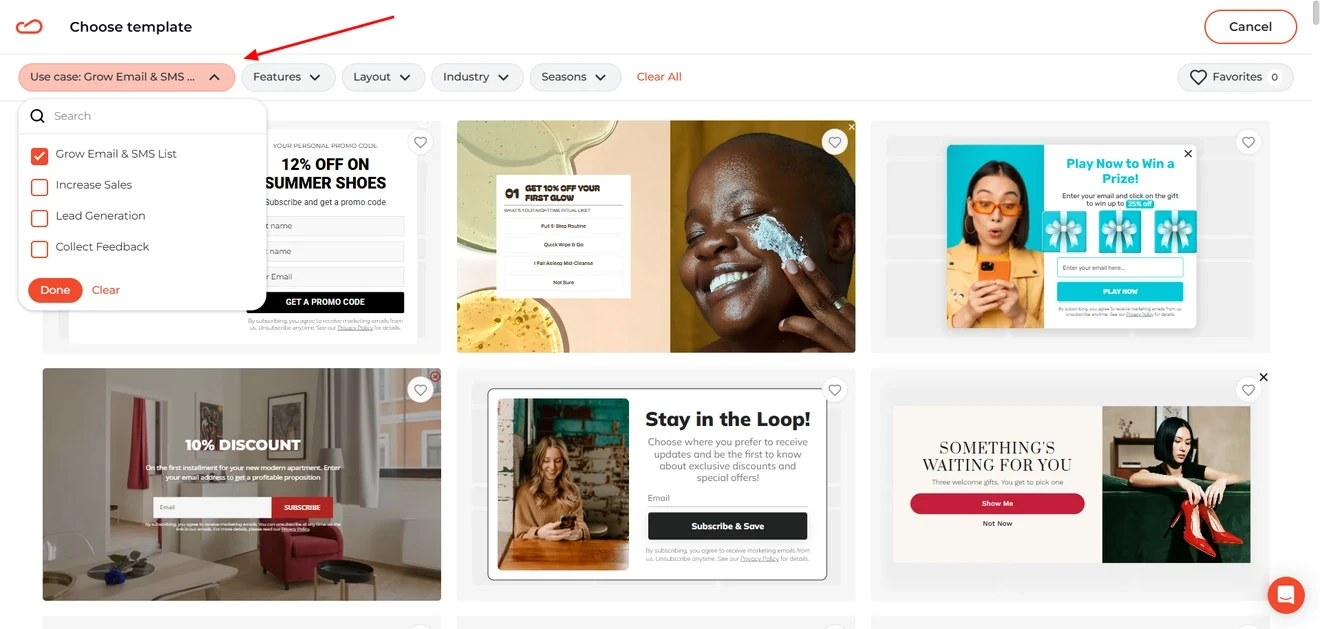
The template does not have to match your idea exactly. You can change its content, design, structure, and behavior in the editor.
Step 2. Customize the template
Start with the first thing you want to change — perhaps the headline, image, or button. Click it on the canvas, and its controls will open on the right.
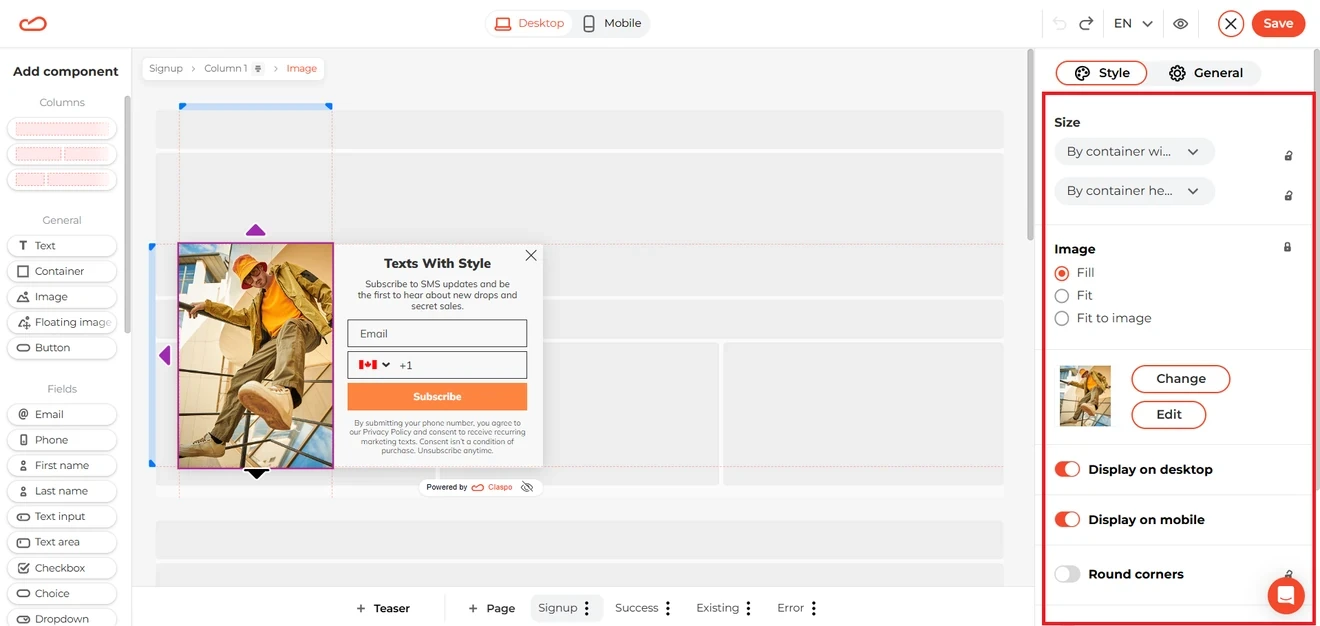
Need to change the structure? Drag existing components to a new position or add others from the left panel.
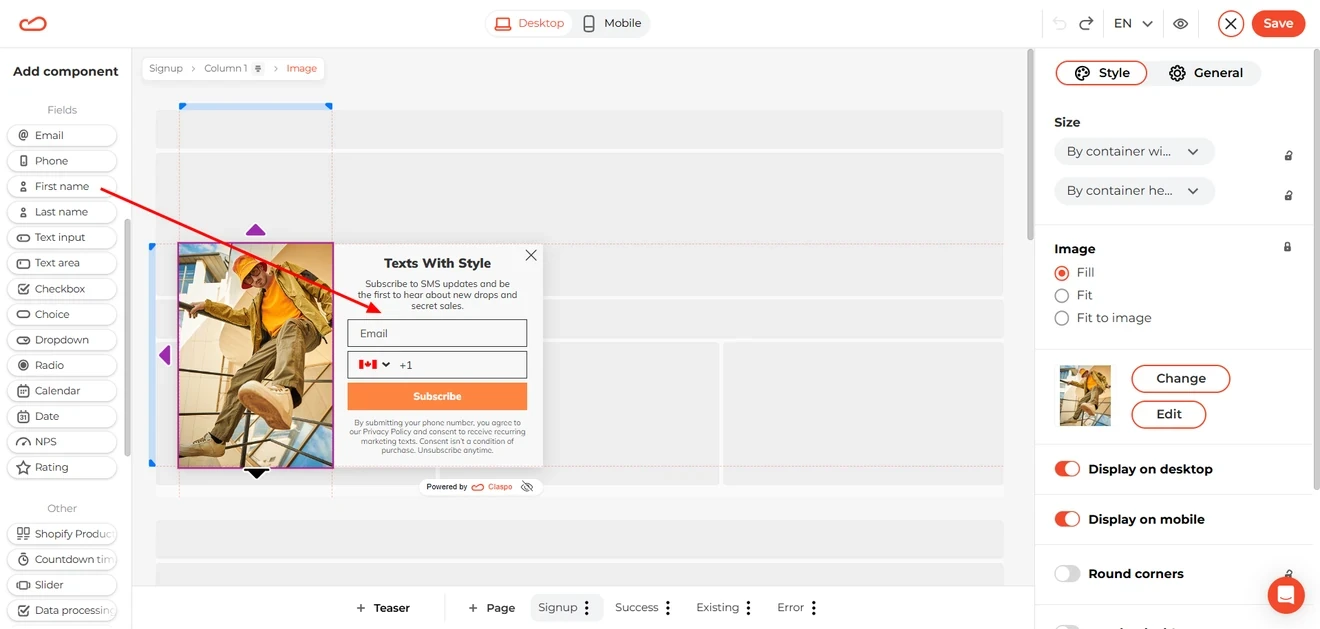
The General tab controls how individual elements work — for example, what happens after a button click.
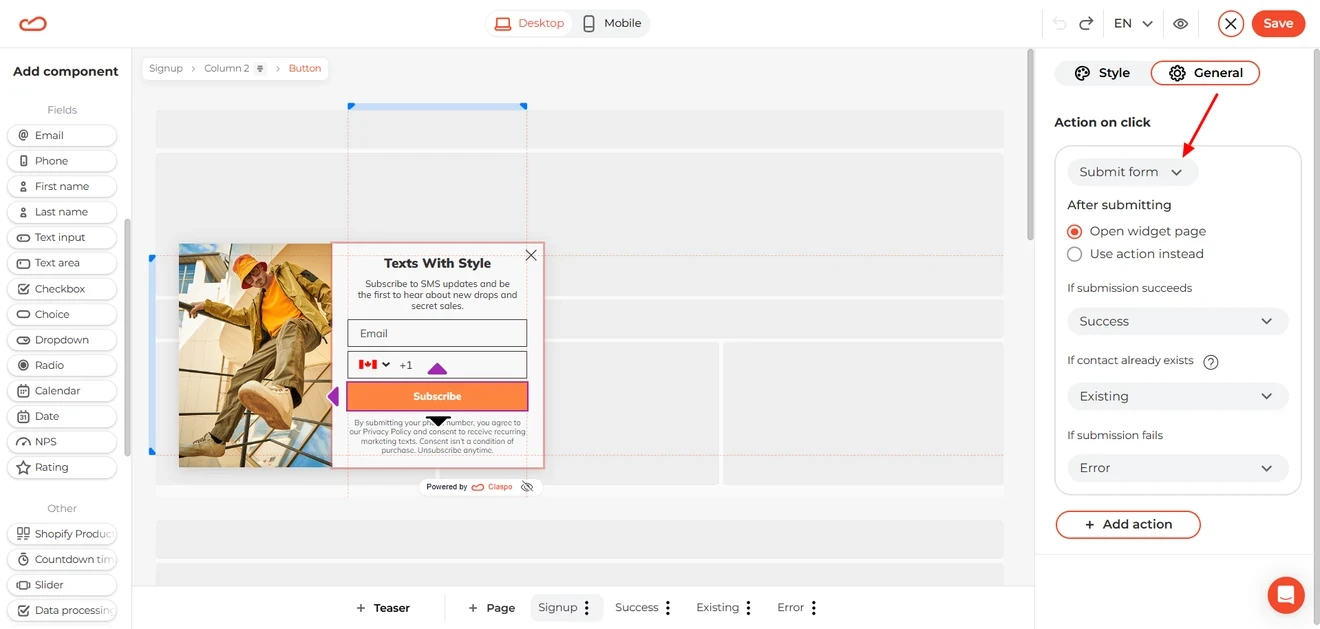
The bottom panel shows all pages in the widget flow. Use it to switch between them, add new pages, or remove optional ones.
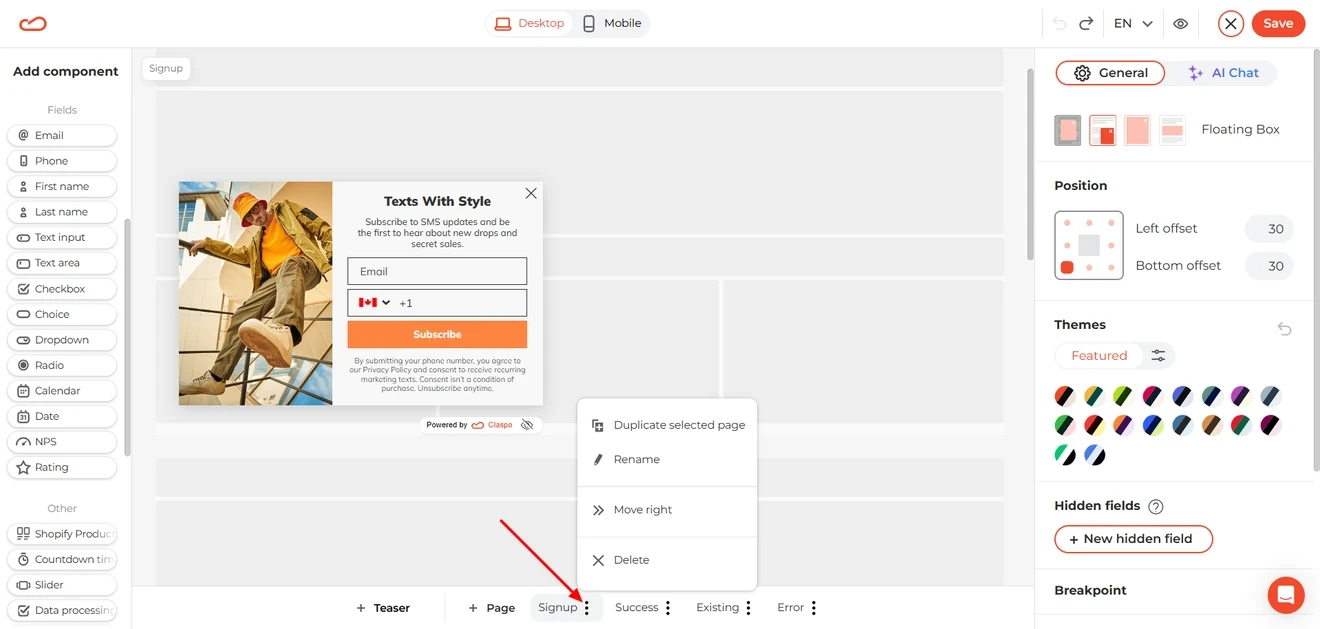
The selected page opens on the canvas, where you can edit its content and design. All changes happen directly on the canvas, so there is no popup HTML code to edit.
Step 3. Check the mobile version
Claspo widgets are responsive by default, but it is still worth checking how the finished popup looks on a smaller screen. Open the mobile version before saving and see how it feels on a narrow screen.
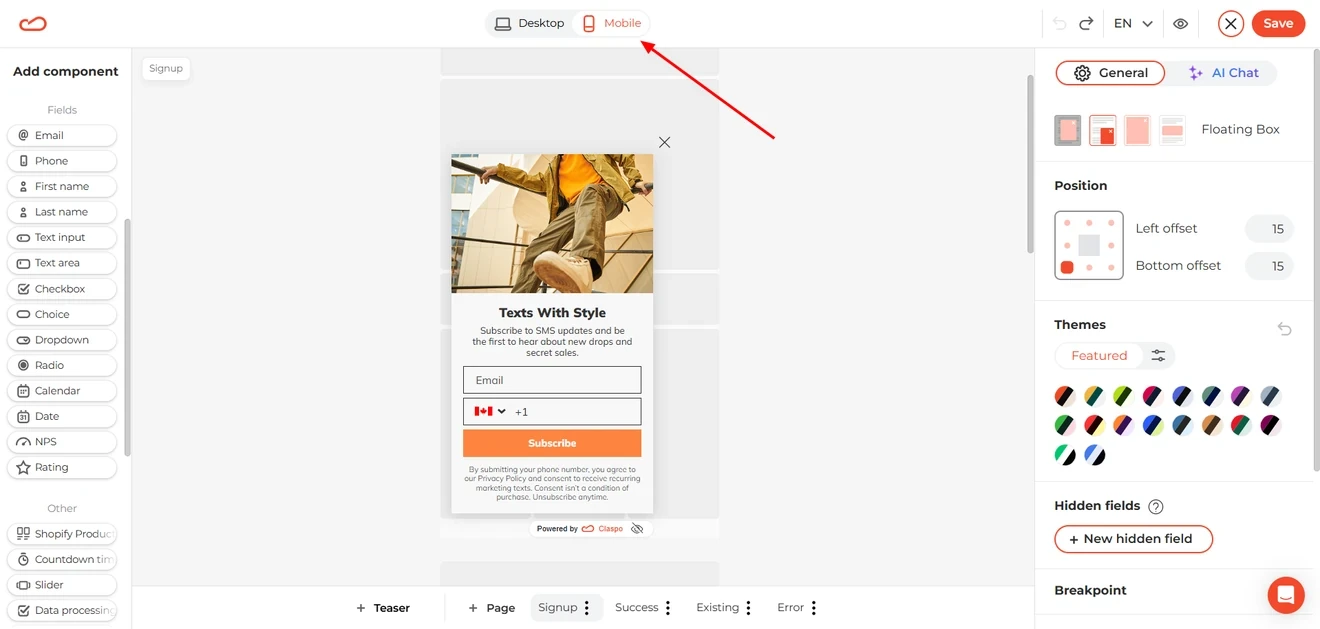
If it looks crowded, hide a large image or simplify the layout. Those edits stay on mobile; the desktop design remains as it is.
Step 4. Set the display rules and publish
Save the design, then decide where and when the popup should appear. You can use a time delay, scroll depth, page targeting, and other conditions to match the campaign to visitor behavior.
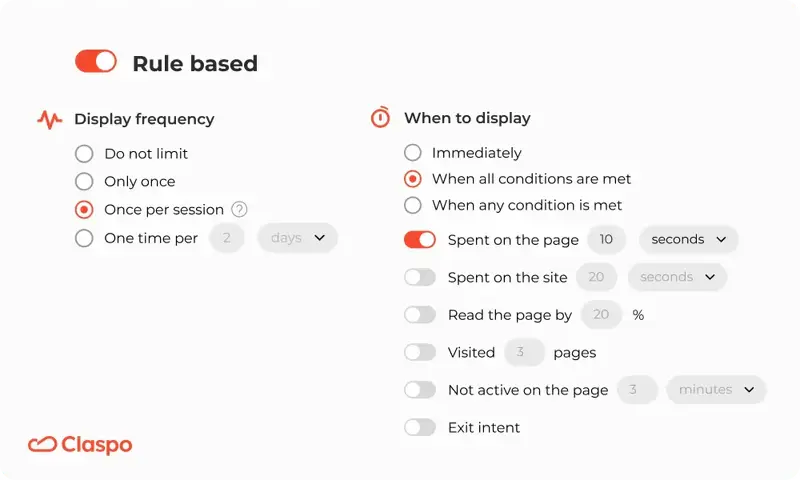
If the popup collects contact details, connect your ESP or CRM so the submitted data goes to the right platform.
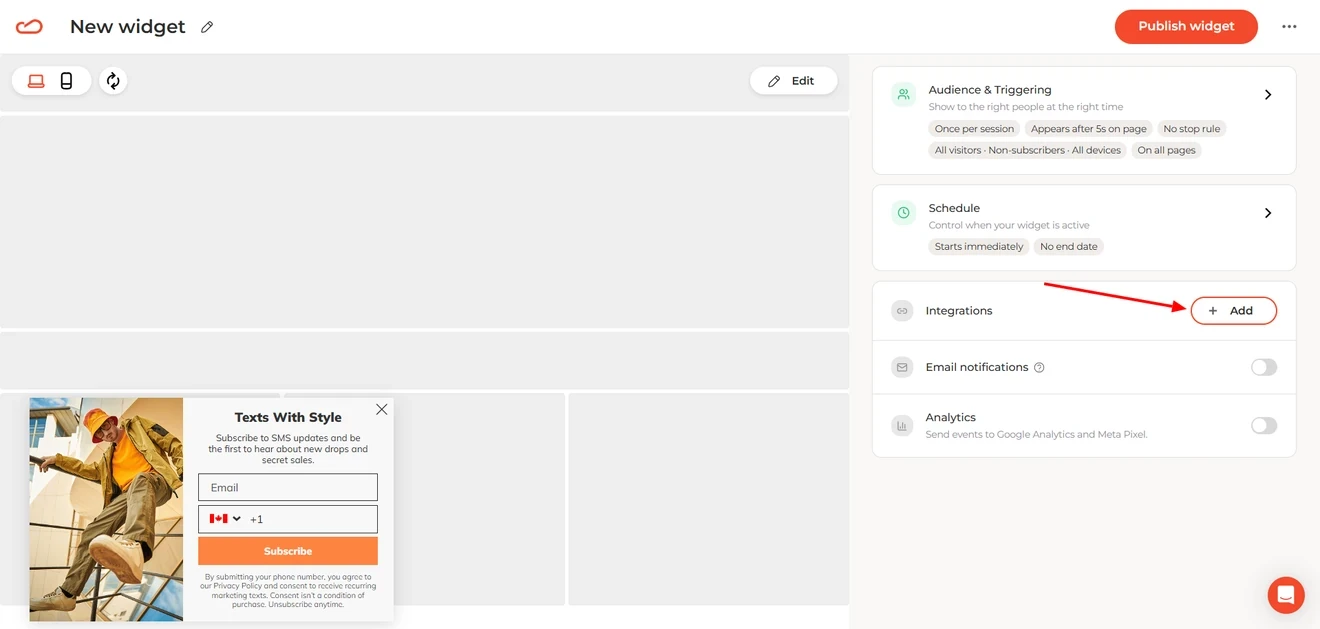
Your website only needs to be connected to Claspo once. After that, you can publish new popups and update existing ones from your account without adding separate popup code for every campaign.
How to make your popup user-friendly
A popup becomes frustrating when the offer takes too long to understand or the next step is unclear. The following practices help avoid both.
Make the value obvious
Put the actual offer in the headline. “15% off your first order” says more than “A little surprise for you”. For an early-access campaign, name the sale, collection, or event people are signing up for. The CTA should continue the same thought rather than introduce a different promise.
Give each button a purpose
A simple signup or promo popup usually needs one main CTA. In our study, 87% of top ecommerce promo popups used a single high-contrast button.
Choice flows are different. Their buttons collect preferences rather than compete for attention. According to our popup conversion benchmarks, they averaged 5% CR versus the 3.67% baseline and provided useful data for segmentation. Keep each option distinct and use the answer to shape the next step or follow-up.
The close button should remain visible without drawing attention away from the main action.
Ask only for the information you need
Nine out of ten top-performing ecommerce signup forms in our research contained only one or two fields. Every form asked for an email, while 40% also collected a name.
That does not mean every popup must stop at two fields. It means each additional question needs a reason. If you also want a phone number or preferences, consider asking for them on the next step and explain what the visitor gets in return.
Give every field a permanent label. A placeholder can show an example, but it should not be the only clue to what belongs in the field.
Match the layout to the offer
Different types of popups ask for different amounts of attention. A floating box may suit a quiet reminder, while a standard popup gives a signup offer more room.
Fullscreen led our layout benchmark with a 7.17% average CR. Standard popups reached 4.96%, followed by floating boxes at 2.57% and floating bars at 1.28%.
This does not make fullscreen the default choice. Save it for a major seasonal sale, a high-value discount, early access, or another offer people can understand within a few seconds. Timing and frequency matter more here, and the way out should always remain visible.
If these formats are new to you, What is a popup? covers the basics and explains where popups fit into a website.
Give visitors some control over the timing
Not every message needs to appear automatically. If the popup supports an action the visitor has already chosen — opening a size guide, requesting a quote, joining a loyalty program, or viewing more details — a popup on button click can feel like a natural continuation of the page.
For automatic campaigns, consider what happens after someone closes the main window. Reopening the same popup may feel pushy. A small teaser keeps the offer available without taking over the screen again. Popups with teasers reached a 6.89% average conversion rate in our benchmark.
Make the popup accessible
Test the popup without touching the mouse. Tab through its fields and buttons, check that the focus indicator stays visible, and press Esc to close it. A screen reader should announce the popup and identify each control correctly. Claspo provides the underlying support for keyboard navigation, focus management, screen reader semantics, and programmatic form labels.
Claspo handles the technical side, but it cannot fix pale text or write alt text for your product image. Those content choices remain yours. See our accessibility guide for what to check before publishing.
How to trigger and target popups without annoying visitors
A 30-second delay may look like the safe choice. Our data suggests otherwise.
Pick the trigger for the job
Page-view triggers led our ecommerce grow-list benchmark with a 5.08% average CR. Immediate display followed at 4.42%, while a 30-second delay reached only 1%. Waiting longer did not make the offer convert better.
Show a clear welcome offer immediately or after a few seconds. If visitors need more context, wait until they have viewed several pages. Keep exit intent for recovery, and use scroll triggers when reaching a certain part of the page makes the message relevant.
Stop after conversion
Popups that stopped after form submission averaged 3% subscription CR in our analysis of widgets with more than 953 million impressions. Those without this rule averaged 0.46% — about 6.5 times lower.
Once someone submits the form, showing it again wastes impressions and muddies campaign data. Stop the popup after conversion and exclude existing subscribers from acquisition offers.
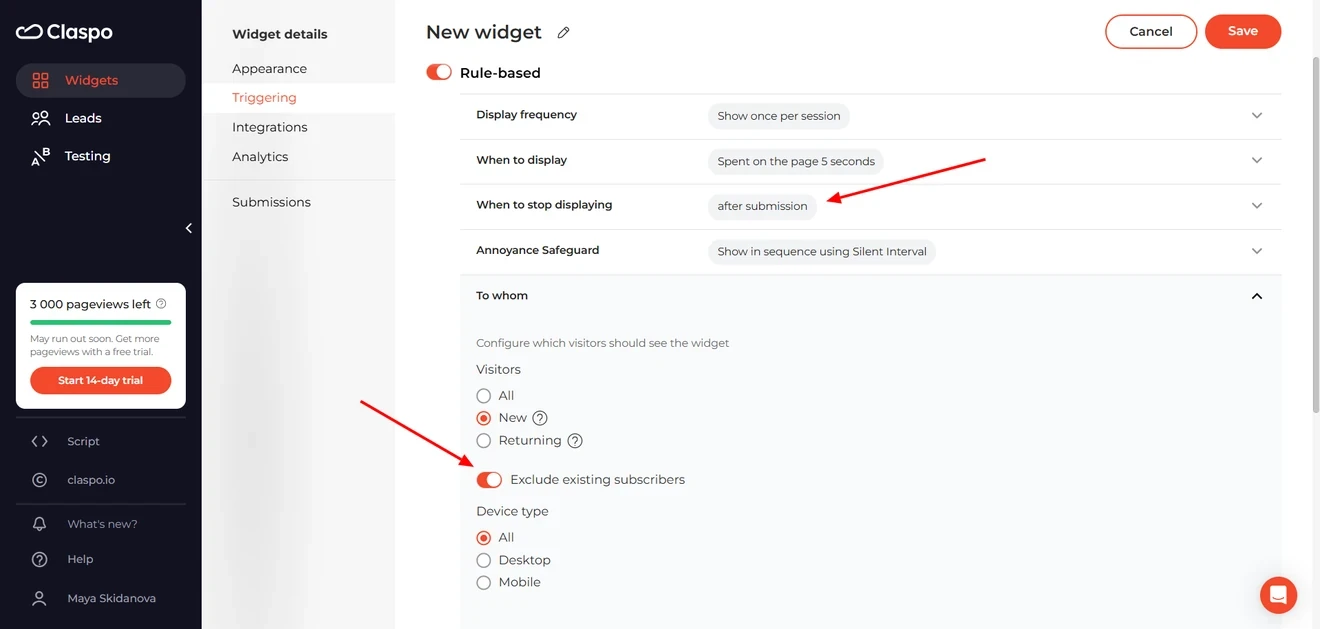
Otherwise, you may keep asking for an email you already have or give a first-order discount to an existing customer.
For a hand-coded HTML popup form, suppression and frequency limits require additional JavaScript. They are not part of the popup HTML code or CSS.
Keep campaigns from colliding
Every Claspo template, including our email signup templates, comes with a silent interval already set.
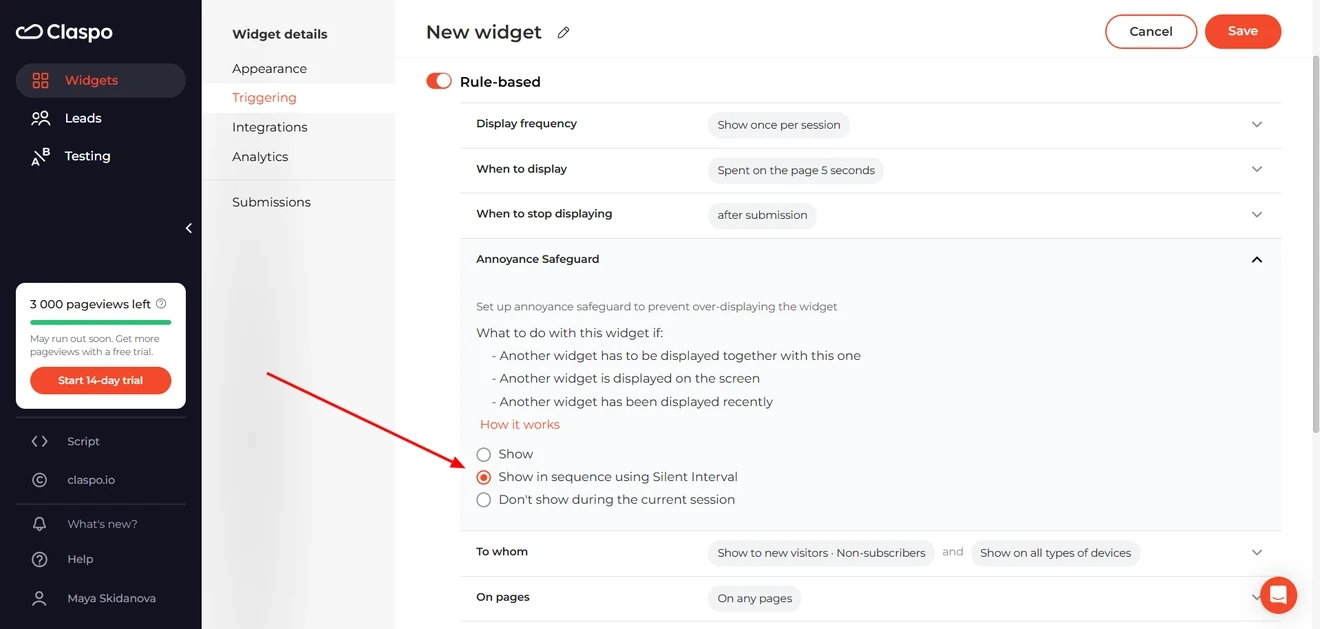
This keeps active widgets from opening together, though you can change the interval if needed.
A popup overlay should focus attention on one message, not become a background for another popup. The silent interval spaces out different widgets. For the same popup, set separate limits on repeat views after someone closes it.
Code the interface. Use a builder for the campaign
A custom HTML popup makes sense when it belongs to the website itself. Think of a login window, confirmation dialog, size guide, or another action tied closely to your application. Keeping it in the codebase gives developers direct control over its logic and maintenance.
Marketing popups have a different lifecycle. Offers change, audiences shift, and teams need to adjust triggers, frequency, integrations, and campaign flows. Once you build all of that manually, you are no longer coding one popup. You are maintaining a popup system. Planning more than one campaign? Our popups playbook can help you choose the next tactic based on your goal, from growing your list to recovering abandoned carts.
That is the practical choice. Keep stable interface elements in code. Use Claspo when marketers need to launch, test, and update campaigns without waiting for another development cycle.