What it solves & why businesses use it
Product bundles solve a common e-commerce challenge: customers often don’t realize which products work well together or miss out on add-ons they would’ve bought. This widget shows product sets or kits that add value and make checkout decisions simpler.
By showing widgets with product bundles, you:
- Increase cart value by offering bundled products at a discounted price.
- Create the opportunity to cross-sell related products that the customer might not have purchased otherwise.
- Clear out older inventory or push high-margin products that might otherwise not sell as quickly..
- Provide higher value for customers by offering related items in one package, making the purchasing decision easier and adding value through the discount.
- Enhance the customer experienc by providing a one-stop solution and potential savings on complementary items.
From our benchmarks, widgets that try to lift the order total draw steady engagement. In e-commerce, they average around 5.41% CTR, and in food and drink they’re close at 5.16%. Bundled products often show similar behavior because they shorten the decision process. Instead of comparing items one by one, everything is already grouped, so people can move through the checkout with less hesitation.
When & how to use it
Product bundles widgets work best when visitors are already engaged — scrolling, browsing collections, or checking out specific products. They’re great for both new and returning users who’ll appreciate curated sets, seasonal kits, or limited-time deals.
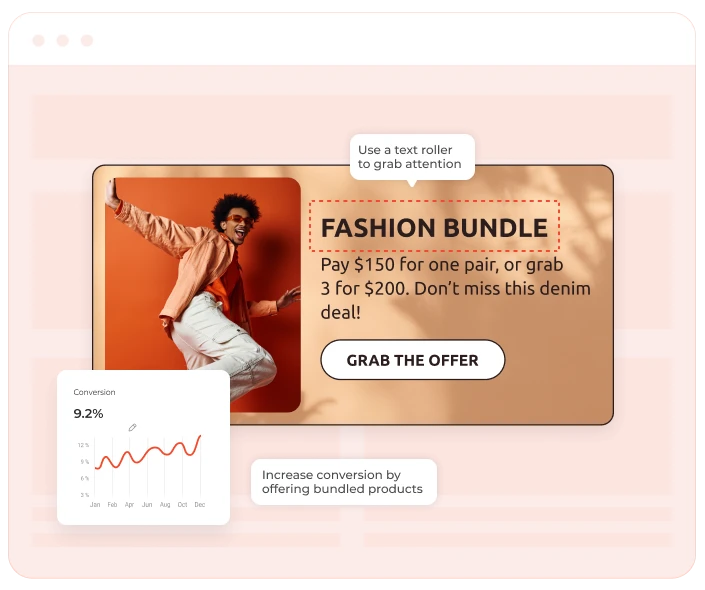
Use a built-in widget on product pages to show fixed bundles like ‘Complete the look’ or ‘Skincare starter set’. It’s an easy way to suggest products that go well together without making shoppers search.
Category and collection pages are also perfect for these widgets. These pages show buying intent, and a well-placed bundle can push users to explore more or add extra to their cart.
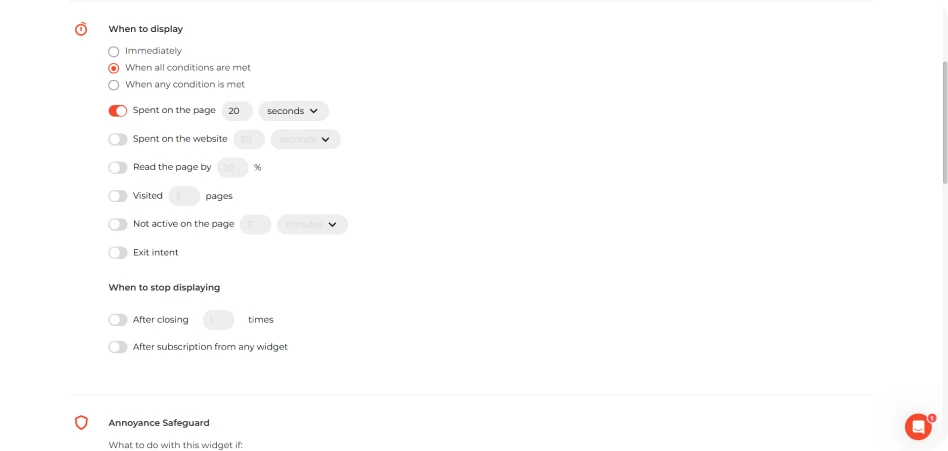
For promos or time-sensitive deals, a floating box triggered after scroll or a short delay works well. For example, a ‘Weekend deal set’ shown after 20 seconds can catch attention without disrupting the flow.
How it looks
A built-in widget works best on pages, where it feels like a natural part of the layout. It usually includes product images, bundle name, savings label (if applicable), and CTA.
A floating box is better for short-term bundle promotions, so you can add a countdown timer to it.
Pop-ups can work too but sparingly. They’re best reserved for bundles tied to promotions (such as holiday kits, launch offers). Use them on exit intent to avoid interrupting browsing.
Pairs well with
Product bundles widgets combine smoothly with first purchase discounts. Also, you can add a testimonial slider nearby to build confidence in the bundle, or use a newsletter sign-up form to offer an exclusive bundle to email subscribers only.