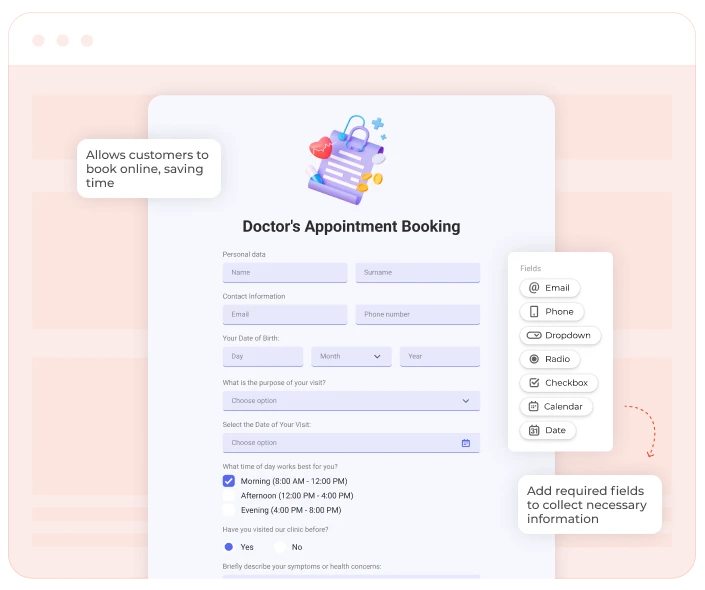
Booking form

Automate booking & enhance user experience

Simplify scheduling and enhance the customer experience, ultimately leading to higher conversion rates and greater customer satisfaction.

Start for Free Now

What it solves & why businesses use it

A booking form helps businesses automate the process of capturing customer details and scheduling services, addressing the following challenges:

  • Simplifies the booking process: Allows customers to book appointments online, saving time for both the customer and the business.

  • Improves scheduling efficiency: Helps businesses manage their schedule and offer customers real-time availability.

  • Enhances customer experience: Provides users with a convenient and self-service way to book services, improving satisfaction and reducing friction

  • Automates confirmations and reminders: Sends automatic booking confirmations and reminders, reducing no-shows and increasing customer engagement.

When & how to use it

A booking form is most effective when it’s presented to customers who are ready to schedule an appointment or service. Key triggers and use cases include:

  • Homepage: Place the booking form prominently on the homepage, especially if it’s a key service your business offers.

  • Service pages: Display the form on individual service pages, allowing users to select a specific service and easily schedule an appointment for that service.

  • After spending time on a service page: Trigger the booking form if users linger on a service or appointment page for a certain amount of time, suggesting that they’re considering booking.

  • Exit intent: Show the booking form when a user tries to leave the page, offering them an easy way to schedule before they exit.

  • Mobile devices: Make the form easily accessible on mobile devices, especially with a sticky launcher that users can tap to access the booking form at any time.

How it looks

A booking form should be easy to navigate, with clear instructions for users and minimal distractions. It typically includes:

  • Date & time picker: A calendar or date/time selection tool that allows users to choose their preferred appointment time from available slots.

  • Service selection: Dropdown or checkboxes for users to select the service they want to book, making it easy to choose the right option.

  • Customer information: Fields to collect basic customer details like name, email, phone number, and any special requests or notes for the service.

  • Confirmation options: A confirmation message once the user submits their request.

  • Design: The form should be visually appealing, mobile-responsive, and aligned with the website's overall aesthetic. It should be easy to navigate, with clear instructions for users and minimal distractions.

How to set it up

Step 1. Decide on a template

Explore our library of booking widgets to find a booking form template that fits your project.

Step 2: Customize

Carefully review the template of the online booking form and check what needs to be changed to align the form with your goals. Besides the text, you can modify colors, fonts, placeholders, and icons. Make all the necessary changes required for your needs.

Step 3. Booking form placement

The goal is to place your booking form where it naturally fits into the customer journey.

The booking form example for this case is an embeddable widget, meaning you can place it right in the page's content. To set this up, you'll need a CSS selector. Not sure how to find it? No worries — there’s a step-by-step guide in the settings to walk you through the process.

Once you have the selector, you'll also need to decide on the placement. This determines exactly where the widget will appear on your page.

Before finalizing everything, it's a good idea to test it out. Click the Test Widget button to preview how it looks and functions on your site. If everything checks out, you're good to go!

Step 4: Display rules

For embedded widgets, you can control where and who sees them. You need to specify where the booking form should be placed using the URL or other options. Additionally, you can indicate for which locations and devices the form should be available.

Step 5: Integrate with your marketing tools

Once your booking request form is ready, connect it to your CRM and/or ESP using Claspo’s native integrations or set up a webhook to send submissions to any other tool. This ensures your sales or customer service team can act on every lead immediately — sending confirmations, reminders, or follow-ups.

That’s it — save the widget and publish!

Fully designed service request form templates

Explore our entire library and find the perfect template to launch your next campaign in no time.

Proven recipes to collect service requests

No matter what your goal is, there’s a widget for that. Explore pre-designed, user-friendly templates and find the perfect fit for your next campaign.

Need help or have questions?

Book a Call